RESERVA DE CARONA
ÍNDICE
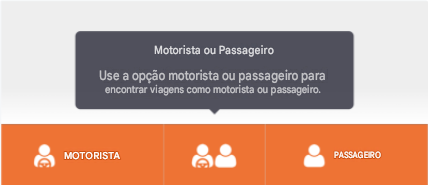
As reservas de caronas são feitas através do aplicativo do usuário em seus dispositivos móveis. Após o login, os usuários verão três botões que os direcionarão para a página de reservas.
Por favor, tome nota do seguinte:

A pessoa designada para a carona é aquela que irá se encontrar com o passageiro, seja ele público ou privado.Acompanhantes podem ser convidados individualmente para participar de uma carona. Caso convide vários acompanhantes para uma carona privada, apenas um poderá aceitar.
 Ver Recurso de passeios privados artigo para tutorial.
Os passageiros extras, por outro lado, viajam na mesma rota que o passageiro solicitado e não aceitam uma carona compartilhada. Para obter orientações sobre como adicionar passageiros extras, consulte  Carona - Adicionando Passageiros Extras.
Não adicione um co-participante do carro como acompanhante e passageiro extra.
Para aumentar as chances de encontrar outro parceiro para compartilhar carro, aqueles que possuem um veículo e também estão dispostos a serem passageiros podem selecionar o botão Motorista ou Passageiro.
Abaixo, você encontrará um tutorial em vídeo passo a passo sobre o processo de reserva de caronas.
1. Criar uma nova solicitação de viagem
Para reservar uma viagem, é necessário inserir inicialmente os endereços de origem e destino.
Observação:
É importante verificar os demais detalhes (data e horário de partida, acompanhante, etc.) antes de enviar a solicitação de reserva.
13 STEPS
1. Click anywhere to start the tutorial. You can use the magnifying glass icon to zoom in/out if needed.

2. To book a carpool trip, click on any of the three buttons (Driver, Driver or Rider, and Rider) at the bottom of the screen.
Note: To book as a Driver, you should have vehicle details saved on your profile. Else, you can book the trip as a Rider.

3. Tip: If you have a vehicle and is also willing to be a passenger, then choosing the Driver or Rider button will increase your chances of matching with another carpooler.

4. Click Create New Ride Request.

5. Input the address of your Drop-off or Arrival location. Once done, click Confirm Destination.

6. Input the address of your Pick-up or Departure location. Once done, click Confirm Origin.

7. Make sure to also update your trip departure's Date & Time.

8. ou may also request for a Return Trip where you'll also have to indicate the date & time.
For Repeated Rides, just toggle the button and select the day/s you want the ride to be repeated.
Once done, click Confirm Details.

9. Review your details, including the Extra Passengers. Once confirmed, click Submit Booking Request.

10. Tip: If you initially didn’t get a match, it is advised that you don’t cancel the request right away. Any ride that isn't matched will still be available for others to match with, right up until its departure time.

11. If your request successfully matched with another carpooler, you will be able to see your ride's details as well as the name of your co-carpooler.

12. Your successful carpool matches may be seen with its details on the app's home screen.

13. Click anywhere to end the tutorial.

Here's an interactive tutorial
https://www.iorad.com/player/2009282/-Carpool--How-to-create-a-new-ride-request-
13 STEPS
1. Clique em qualquer lugar para iniciar o tutorial. Você pode usar o ícone da lupa para aumentar ou diminuir o zoom, se necessário.

2. Para reservar uma viagem de carona, toque em um dos botões na parte inferior da tela: Motorista, Motorista ou Passageiro ou Passageiro. Observação: para reservar como Motorista, é necessário ter um veículo cadastrado no perfil.

3. Dica: Se você tiver um veículo e também estiver disposto a ser passageiro, selecionar o botão Motorista ou Passageiro aumentará suas chances de encontrar outro parceiro para compartilhar a carona.

4. Clique em Criar nova solicitação de viagem .

5. Insira o endereço do seu local de entrega ou chegada . Em seguida, clique em Confirmar Destino.

6. Insira o endereço do seu local de partida ou de embarque . Em seguida, clique em Confirmar Origem.

7. Não se esqueça também de atualizar a data e a hora de partida da sua viagem.

8. Você também pode solicitar uma viagem de retorno , onde deverá indicar a data e o horário. Para viagens repetidas , basta ativar o botão e selecionar o(s) dia(s) em que deseja que a viagem se repita. Feito isso, clique em Confirmar detalhes.

9. Por favor, verifique seus dados, incluindo quaisquer passageiros adicionais . Após a confirmação, clique em Enviar Solicitação de Reserva .

10. Dica: Se você não encontrar uma correspondência inicialmente, recomendamos que não cancele a solicitação imediatamente . Qualquer viagem que não encontrar uma correspondência permanecerá disponível para outros usuários até o horário de partida.

11. Se sua solicitação for correspondida com sucesso por outro passageiro, você poderá ver os detalhes da sua viagem, bem como o nome do seu companheiro de carona.

12. Você pode visualizar os detalhes das suas caronas bem-sucedidas na tela inicial do aplicativo.

13. Clique em qualquer lugar para encerrar o tutorial.

Here's an interactive tutorial
https://www.iorad.com/player/2731597/-Carpool--How-to-create-a-new-ride-request-----PT-BR
Recomenda-se clicar no ícone para entrar no modo de tela cheia.
1.1. Troca de Veículo
Essa funcionalidade permite que os usuários escolham qual de seus veículos será usado no percurso, aprimorando a experiência ao eliminar a necessidade de editar ou excluir um veículo e recriar o percurso.
Observação: A troca para um veículo de menor capacidade é restrita e exige o cancelamento e a reserva de uma nova viagem.
5 STEPS
1. Click the start tutorial to start. You can use the magnifying glass icon to zoom in/out if needed.

2. Click on Edit Button to change the vehicle

3. Select the Vehicle

4. The Vehicle has been changed. Click anywhere to move next.

5. Click anywhere to finish the tutorial.

Here's an interactive tutorial
https://www.iorad.com/player/2381469/-Carpool----How-to-change-the-vehicle-
5 STEPS
1. Clique em " Iniciar tutorial" para começar. Você pode usar o ícone da lupa para ampliar ou reduzir o zoom, se necessário.

2. Clique no botão Editar para alterar o veículo.

3. Selecione o veículo

4. O veículo foi alterado. Clique em qualquer lugar para prosseguir.

5. Clique em qualquer lugar para finalizar o tutorial.

Here's an interactive tutorial
https://www.iorad.com/player/2734954/-Carpool----How-to-change-the-vehicle-----PT-BR
Recomenda-se clicar no ícone para entrar no modo de tela cheia.
Observação: O botão "Atualizar veículo" é removido do aplicativo do motorista para caronas aceitas quando o recurso de rede que restringe essa ação está ativado.
1.2. Passeios regulares
Esta funcionalidade mostra as três viagens mais populares, organizadas por horário de partida mais recente, simplificando o processo de reserva, especialmente para viagens com origem e destino no mesmo endereço.
Observação: Os endereços ainda podem ser atualizados mesmo após selecionar Viagens Regulares.
10 STEPS
1. Click anywhere to start the tutorial. You can use the magnifying glass icon to zoom in/out if needed.

2. This feature shows your top three rides sorted by the latest Departure Time. This feature makes it easier for users to book for rides particularly for the same Origin and Destination addresses.

3. To book your carpool trip, click on any of the three buttons at the bottom of the screen. You will then see your Regular Rides.
Select which Regular Ride you want to book to proceed.

4. Your Pick-up and Drop-off locations will automatically be populated, but you can still update these locations by clicking the check icon.
You may also update the other details of your carpool ride by clicking on the check icon.

5. Update with your desired date & time, and indicate if Return Trip or Repeated Ride is required as needed.
Once done, click Confirm Details.

6. Review your details before confirming your ride request. Once done, click the Submit Booking Request at the bottom part of your screen.

7. Tip: If you initially didn’t get a match, it is advised that you don’t cancel the request right away.
You may Edit your Booking or Wait For Match.

8. Rides that are currently unmatched will have the Looking For Match status
Any ride that isn't matched will still be available for others to match with, right up until its departure time.

9. You will receive an in-app and SMS notification of when your ride has found a match. Opening the notification will redirect you to another page with further details of the booked ride and the matched carpooler.

10. Click anywhere to finish the tutorial.

Here's an interactive tutorial
https://www.iorad.com/player/2009287/-Carpool--How-to-book-using-Regular-Rides-
10 STEPS
1. Clique em qualquer lugar para iniciar o tutorial. Você pode usar o ícone da lupa para aumentar ou diminuir o zoom, se necessário.

2. Esta funcionalidade mostra as suas três viagens mais populares, ordenadas pela hora de partida mais recente. Isso facilita a reserva de viagens, especialmente para endereços de origem e destino semelhantes.

3. Para reservar sua viagem de carona, clique em qualquer um dos três botões na parte inferior da tela. Você verá então suas Viagens Regulares .
Selecione a Viagem Regular que deseja reservar para prosseguir.

4. Os locais de embarque e desembarque serão preenchidos automaticamente, mas você ainda pode atualizá-los clicando no ícone de confirmação .
Você também pode atualizar outros detalhes da sua carona clicando no ícone de confirmação .

5. Atualize com a data e hora desejadas e indique se é necessária uma viagem de ida e volta ou uma nova viagem
. Depois de concluir, clique em Confirmar detalhes.

6. Revise seus dados antes de confirmar sua solicitação de viagem. Depois disso, clique em " Enviar Solicitação de Reserva" na parte inferior da tela.

7. Dica: Se você não encontrou um par inicialmente, recomendamos que não cancele a solicitação imediatamente .
Você pode editar sua reserva ou aguardar um par .

8. As viagens que ainda não foram correspondidas terão o status " À procura de correspondência".
Qualquer viagem que não tenha sido correspondida continuará disponível para que outros a correspondam, até o horário de partida.

9. Você receberá uma notificação por SMS no aplicativo quando sua viagem encontrar um passageiro compatível. Ao abrir a notificação, você será redirecionado para outra página com mais detalhes sobre a viagem reservada e o passageiro compatível.

10. Clique em qualquer lugar para finalizar o tutorial.

Here's an interactive tutorial
https://www.iorad.com/player/2734958/-Carpool--How-to-book-using-Regular-Rides-----PT-BR
Recomenda-se clicar no ícone para entrar no modo de tela cheia.
1.3. Atualizando os detalhes da viagem
Caso seja necessário atualizar os detalhes de uma viagem, o usuário poderá:
- Clique no ícone de lápis correspondente à atração que precisa ser atualizada; ou
- Clique na atração para ver os detalhes e, em seguida, clique no ícone de três pontos para editar.
14 STEPS
1. Click anywhere to start the tutorial. You can use the magnifying glass icon to zoom in/out if needed.

2. There are two ways to update the details of a ride:
1. Click on the Pencil icon corresponding to the ride you specifically want to update.

3. You will be redirected to the Booking Request Summary page where you may update any detail of your trip.

4. You may adjust the number of passengers from Passenger Settings. Once done, click Confirm Details.

5. You may also update your ride date and time as needed. Once done, click Confirm Details.

6. Once you're done with the updates, click Submit Booking Request.

7. If your ride still has no match found, you may either Edit the Booking or Wait For Match.

8. 2. You may also update your ride details by clicking the specific ride to see its details.

9. Click on the three-dots icon on the top-right part of your screen.

10. Click Edit Ride.

11. Edit your ride's details as needed. Once done, click Submit Booking Request.

12. Rides that are currently unmatched will have the Looking For Match status
Any ride that isn't matched will still be available for others to match with, right up until its departure time.

13. You will receive an in-app and SMS notification of when your ride has found a match. Opening the notification will redirect you to another page with further details of the booked ride and the matched carpooler.

14. Click anywhere to finish the tutorial.

Here's an interactive tutorial
https://www.iorad.com/player/2009291/-Carpool--How-to-update-ride-details-
14 STEPS
1. Clique em qualquer lugar para iniciar o tutorial. Você pode usar o ícone da lupa para aumentar ou diminuir o zoom, se necessário.

2. Existem duas maneiras de atualizar os detalhes de uma atração:
1. Clique no ícone de lápis correspondente à atração que você deseja atualizar.

3. Você será redirecionado para a página de Resumo da Solicitação de Reserva , onde poderá atualizar qualquer detalhe da sua viagem.

4. Você pode ajustar o número de passageiros em Configurações de Passageiros . Depois de concluir, clique em Confirmar Detalhes .

5. Você também pode atualizar a data e a hora da sua viagem, se necessário. Depois de concluir, clique em Confirmar detalhes .

6. Após concluir as atualizações, clique em Enviar Solicitação de Reserva .

7. Se ainda não houver correspondência para a sua viagem, você pode editar a reserva ou aguardar por uma correspondência .

8. 2. Você também pode atualizar os detalhes da sua viagem clicando na viagem específica para visualizar as informações.

9. Clique no ícone de três pontos no canto superior direito da tela.

10. Clique em Editar Percurso .

11. Edite os detalhes da sua viagem conforme necessário. Quando terminar, clique em Enviar Solicitação de Reserva .

12. As viagens que ainda não foram correspondidas terão o status " À procura de correspondência". Qualquer viagem que não tenha sido correspondida continuará disponível para que outros a correspondam, até o horário de partida.

13. Você receberá uma notificação por SMS no aplicativo quando sua viagem encontrar um passageiro compatível. Ao abrir a notificação, você será redirecionado para outra página com mais detalhes sobre a viagem reservada e o passageiro compatível.

14. Clique em qualquer lugar para finalizar o tutorial.

Here's an interactive tutorial
https://www.iorad.com/player/2734965/-Carpool--How-to-update-ride-details-----PT-BR
Recomenda-se clicar no ícone para entrar no modo de tela cheia.
1.4. Correspondência encontrada!
Para viagens públicas, é normal que um usuário leve algum tempo para encontrar um veículo que corresponda à sua necessidade de transporte.
Observação: O sistema determina se uma viagem pode ser uma combinação viável com outra, mesmo que elas não tenham exatamente o mesmo local e horário. Essas combinações são sinalizadas como "Não Ideal". Uma mensagem aparecerá indicando que a combinação não é ideal e o usuário poderá escolher se deseja prosseguir ou não.
Dica: Caso não haja correspondência inicialmente, recomenda-se não cancelar a solicitação imediatamente. Qualquer viagem não correspondida permanece disponível para outros usuários até o horário de partida.
Uma notificação no aplicativo avisará quando a viagem encontrar uma correspondência. Ao abrir a notificação, você será redirecionado para outra página com mais detalhes sobre a viagem reservada e o passageiro correspondente.
9 STEPS
1. Click anywhere to start the tutorial. You can use the magnifying glass icon to zoom in/out if needed.

2. When booking for Public Rides, it is normal that a user will take time to look for a match for their ride.
Tip: To increase your chances of getting a match, choose the Driver or Rider if you have a vehicle and is also willing to be passenger.

3. Create a New Ride Request or book using your Regular Rides.

4. Update the details in the Booking Request Summary page for the Locations, Date & Time, Extra Passengers, etc. Click on Submit Booking Request to proceed.

5. Note: The system is smart enough to know if your ride will be a feasible match to another ride even if they do not have the exact same location and time details. Such matches will be flagged as "Not Optimal".

6. There should be a prompt that states that the match is not optimal and a user may choose either proceed or not. Clicking on the X button will Decline the matched ride and ask the user to Confirm.

7. For optimal ride matches, this is how the user's screen should display. This will include the date and time of the ride and the name of the co-carpooler.
Click the check icon to accept the match.

8. Your matched carpool rides will be displayed on the app's home screen with Accepted status.

9. Click anywhere to finish the tutorial.

Here's an interactive tutorial
https://www.iorad.com/player/2009293/-Carpool--Match-Found-
9 STEPS
1. Clique em qualquer lugar para iniciar o tutorial. Você pode usar o ícone da lupa para aumentar ou diminuir o zoom, se necessário.

2. Ao reservar viagens no serviço de transporte público, pode levar algum tempo para encontrar um passageiro compatível.
Dica: aumente suas chances selecionando “Motorista” ou “Passageiro” se você tiver um veículo e também puder viajar como passageiro.

3. Crie uma nova solicitação de viagem ou reserve usando suas viagens regulares .

4. Atualize os detalhes na página Resumo da Solicitação de Reserva, incluindo Locais, Data e Hora, Passageiros Adicionais, etc. Clique em Enviar Solicitação de Reserva para prosseguir.

5. Observação: O sistema é inteligente o suficiente para saber se sua viagem será uma combinação viável com outra viagem, mesmo que elas não tenham exatamente o mesmo local e horário. Essas combinações serão sinalizadas como "Não ideais" .

6. Deverá aparecer uma mensagem informando que a viagem não é ideal e o utilizador poderá escolher se deseja prosseguir ou não . Clicar no botão "X" irá recusar a viagem e pedir ao utilizador que confirme.

7. Para otimizar a combinação de viagens , a tela do usuário deve exibir a data e a hora da viagem, além do nome do outro passageiro.
Clique no ícone de confirmação para aceitar a combinação.

8. As suas viagens de carona combinadas serão exibidas na tela inicial do aplicativo com o status "Aceito" .

9. Clique em qualquer lugar para finalizar o tutorial.

Here's an interactive tutorial
https://www.iorad.com/player/2734971/-Carpool--Match-Found-----PT-BR
Recomenda-se clicar no ícone para entrar no modo de tela cheia.
2. Como iniciar/concluir uma viagem de carona
Para um guia passo a passo sobre como iniciar e concluir uma viagem de carona, consulte Como iniciar/concluir sua viagem de carona.
Para entrar em contato com seu colega de carona, siga os passos abaixo:
9 STEPS
1. Press anywhere to start

2. Click on the Ride.

3. You may click the Up button to see more information, or Down button to hide information.

4. Click on the Name of your Co-Carpooler to see more information.

5. Below Name is also clickable.

6. Here, you can see the information of your Co-Carpooler. You may click the Phone icon to call, or the message icon to send a message.

7. This is what it would look like if you click the Phone icon.

8. This is what it would look like if you click the Message icon.

9. Click anywhere to End Tutorial.

Here's an interactive tutorial
https://www.iorad.com/player/2503054/Carpool---How-to-contact-your-Co-Carpooler-
9 STEPS
1. Pressione em qualquer lugar para começar.

2. Clique em Passeio .

3. Você pode clicar no botão "Para cima" para ver mais informações ou no botão "Para baixo" para ocultar informações.

4. Clique no nome do seu parceiro de carona para ver mais informações.

5. O nome abaixo também é clicável.

6. Aqui, você pode ver as informações do seu parceiro de carona. Você pode clicar no ícone do telefone para ligar ou no ícone de mensagem para enviar uma mensagem.

7. Esta é a aparência que aparecerá se você clicar no ícone do telefone .

8. Esta é a aparência que aparecerá se você clicar no ícone de Mensagem .

9. Clique em qualquer lugar para encerrar o tutorial.

Here's an interactive tutorial
https://www.iorad.com/player/2734977/Carpool---How-to-contact-your-Co-Carpooler-----PT-BR
Recomenda-se clicar no ícone para entrar no modo de tela cheia.
Em caso de dúvidas ou problemas, consulte o site do serviço ou selecione 'Enviar feedback' ou 'Contatar o suporte' na seção 'Sobre' do aplicativo móvel para obter mais assistência.
